If you are looking to install a straight and sturdy fence around your house or garden, you should know how to use a post-hole digger.
Well, using a post hole digger isn’t as easy as it sounds since the task involves a lot of manual effort and obviously the right technique. Fortunately, the steps listed in this article will ease your job for sure.

This article rounds up the steps to use a post hole digger like a pro and dig uniform holes to install the fence post properly.
You’ll also learn some labor-saving tips to safely dig as many holes as you want! Let’s get started:
How Does a Post-Hole Digger Work?
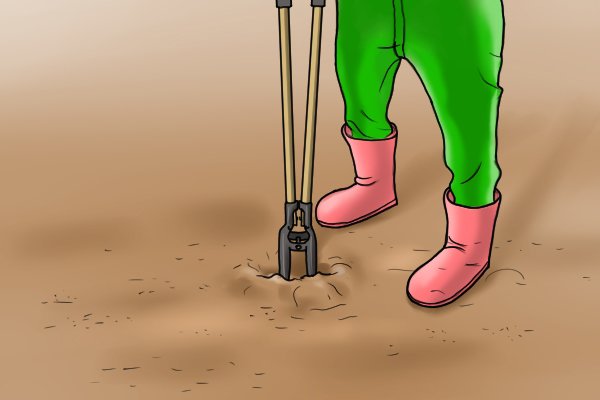
It’s a manually-operated tool that makes the exhausting task of digging holes easier. The post hole digger comprises two long wooden handles attached to a pair of metal scissors or blades.
It works by being thrust into the ground, with the metal scissors in an open position. When closed, the blades loosen a chunk of soil, and then you can clamp it to dig a hole.

Repeating this process helps in digging deep holes in the ground easily, and you can attain uniformity among the holes that are perfect for installing a fence or planting saplings.
There are commonly three types of post-hole diggers that homeowners prefer using. These include:
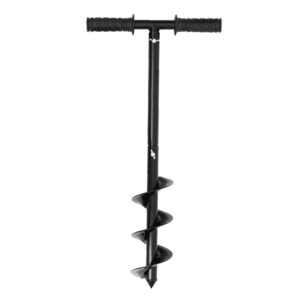
Traditional Post Hole Digger
This is the simplest and most commonly used post hole digger type. The mechanical apparatus consists of two rounded steel blades connected to a pivot point.
Fastened with wooden handles, the blades face each other to pierce the ground quickly. These hole diggers are perfect for areas with moist and loose soil.


Scissor Action Post Hole Digger
Scissor-action diggers are also referred to as split-handled diggers. Cross-over handles resemble those of scissors. As opposed to other types, this digger uses steel tubes to cap the ends of the handles.
In order to increase the strength of the digger, the handles are inserted into the tubes and bolted down.
Due to the welded blades, the digger is, therefore, better suited to working in rocky soil because the handles don’t break away as easily.


Double Pivot
For areas with hard soil and gravel, a double pivot hole digger is the best tool. The double-pivot points increase the clamping power of the blades.
In addition, the extra pivot point prevents the blades from opening too wide and prevents the hole digger from bogging.

Offset
An offset post hole digger has straight handles that are so close that they appear to be a single entity. These handles bend outwards in the opposite direction around the edges for the user to hold them easily.
Moreover, this type of post hole digger requires less force for closing the blades and offers excellent leverage over the other types.
If you want to dig deeper holes, you should opt for an offset hole digger.


Using a Post Hole Digger: A Step-by-step Guide
Dig holes easier and faster by positioning the post hole digger accurately, using this detailed guide.
Whether you are looking to dig a small hole or a deeper one, the following steps will help you throughout the process.
Let’s get started:
Mark the Center of Each Hole
Select and mark the hole position you the fence or plant post to be. Measure the position carefully, and highlight it with paint or hydrated lime powder.
So that you can thrust the post hole digger into the right place.
Also, it reduces the burden of the task, and you can dig out a hole pretty easily.
Use a Spade to Carve Out the Soil Divot
Don’t just start digging right away after marking the area around the hole. First, you should drill a small hole using a spade, so the top layer of the ground, which is often hard, does not create any obstacles.
Moreover, carving out the soil divot gives you an idea of how wide the hole is going to be. Thus, reducing the overall effort required for the task.
Loosen the Ground Using a Tile Shovel
Next, get your hands on a tile shovel and loosen the ground. This step is indispensable for areas with hard soil that contain gravel.
The shovel will glide through soft soil, and there’s no need for hard digging in such scenarios.

Ensure there are no Stones Underground
The metal blades of the post hole digger can bend away quickly if slammed into rocks. So, you should ensure the ground has no rocks. Use a tile shovel and a spade to detect big rocks and remove them manually.
In some cases, the enormous rocks may require you to dig a bigger hole. Try to break the rock down using a hammer and chisel, and dig it out before you proceed with the next step.
Thwack Earth with a Post Hole Digger
Now is the time for some action with the post hole digger. Wear grippy gloves, hold the hole digger, and thwack the earth with it.
You won’t be able to reach a good depth in the first few blows, don’t worry, and keep thwacking the hole digger with the metal blades fully opened.
Lift Out the Soil Using the Post Hole Digger
After you see the soil getting loosened, open the handles so that the blades close and clamp the chunk of soil. Next, pull the post hole digger out, and dislodge the soil.

I would recommend knocking the soil off on a sack so that you can use it for other purposes.
Deepen the Hole as You Need
Deepen the hole by plunging the hole digger into the soil and clamping the soil out. The hole should be at least one foot deep to support a 4-inch round or square post.

If you are looking to plant saplings, then you should dig the hole as per your requirements.
Repeat the Steps for Other Holes
After finishing with one hole, repeat the steps for all other holes you want to dig. Start from step 1 by marking the hole surroundings and then digging it with a spade followed by a tile shovel.
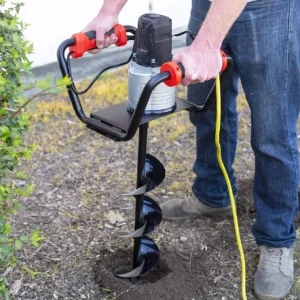
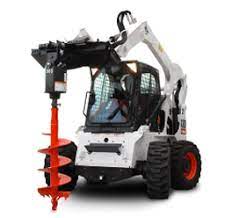
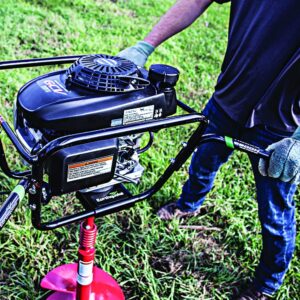
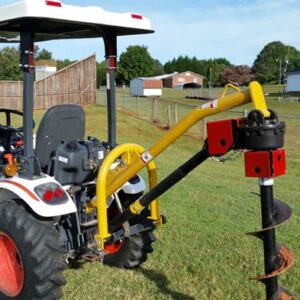
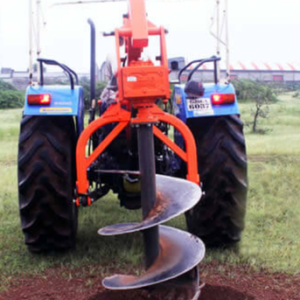
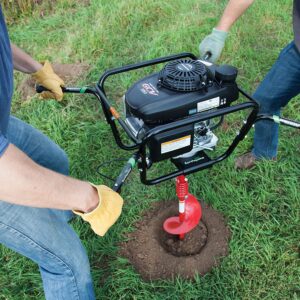
Manual vs. Powered Post Hole Digger: What’s the Difference
Confused between a manual and a powered post hole digger? Here’s what you should know.
A powered post hole digger is an auger that is powered by a motor. This motor powers the blades on the auger, which helps to quickly and easily dig holes in the ground. This tool can be used to dig post holes for fences, decks, and other structures.

Ease of Use
Both manual and powered hole diggers are pretty convenient when it comes to ease of use. However, a manual one requires more manual effort depending on the type of soil.
If you are a tough guy, choose a manual hole digger. Otherwise, get your hands on a powered auger. Learn more about the auger and its types.
Efficiency
Just to set the right expectations, digging holes takes time, so it’s essential to know about the efficiency of both devices.
Powered hole diggers are more efficient since these devices come equipped with bigger motors. Thus, you spend less time digging the perfect hole.
Noise Levels
If you have ever used a powered post hole digger, you already know how noisy these machines can get.
On the other hand, a manual hole digger is nearly silent, and the only noise you hear is the metal blades piercing into the earth.
Cost of Operation
A manual post hole digger is entirely free to use, and all you require is a few minutes to maintain the mechanical apparatus.
Using a powered hole digger can be a little expensive, depending on the cost of gas in your area.
Read More: How To Use An Auger Machine?
In a Nutshell
Now that you know which post hole digger is the right choice, you can get into action.
First, ensure going through the instruction manual if you are going for a powered device to understand its functionality better.
Bestselling Auger For Digging


Trenching Tips to Follow when Using a Post Hole Digger
Here is a handful of trenching tips from the experts you should follow when using a post hole digger. These tips will keep you safe while making digging holes more convenient and less laborious.

Know there are no Power Lines Underground
If you have bought a new property, you probably may not know the position of the power lines.
It would be great to get in touch with the respective local authority to know the location of the lines so that you don’t end up damaging them.
Mark the area with lime powder or use white spray paint to avoid it while excavating the holes.
Sharpen the Post Hole Digger
A post hole digger with blunt blades can make digging holes an enormously laborious task, and if you want to prevent that, sharpen the blades.
There are multiple ways you can get a sharp edge at home. I prefer using a file, but you can also use a grinder to do the job quickly.
Knock Off Sticky Soil
Digging a hole into sticky soil has more chances of the post hole digger bogging into it. Keep a knock block handy, and slam the post hole digger onto it to get rid of the sticky soil.
Or you can use a tile shovel to remove the top layer of the sticky soil before digging a hole with a post hole digger.
Mark the Depth
How do you know that you have reached the right depth? Unfortunately, a measuring tool isn’t the right choice in this case since it can get filled with dirt, and the readings may hide behind the thick layer.
Instead, mark the level on the post hole digger blades to ensure you achieve the required depth. This way, you can easily dig multiple holes of the right depth.
Wear Safety Gear
You don’t need any high-tech safety gear for this task. A pair of gloves, a safety helmet, and goggles are enough. Wearing safety gear reduces the chances of any injuries.
Troubleshooting a Post Hole Digger
When you use a post hole digger regularly, problems are inevitable. But you can fix these issues at home, thus keeping the device in good shape and working properly.
Here are a few troubleshooting tips you should know.
The Blade Not Closing and Opening Properly
Soil contains good amounts of moisture, and that can lead to corrosion on the metal blades. Therefore, you should lubricate the blades regularly so that they work properly.
Also, ensure the blades remain coated in thick corrosion-resistant paint so the metal does not wear out quickly.
The Blades Not Piercing Properly
If the blades aren’t piercing into the soil. It’s a sign that the edges are blunt. Get a metal grinder, and try to sharpen the edges. Once done, you can again start digging holes with a post hole digger.
Loose Handles
The handles are an essential part of a post hole digger. Also, the handles are important to get a firm grip and thrust the pole hole digger with good pressure.
If the handles have worn out, you should replace them at the earliest. Or make sure to use a screwdriver to tighten the handles in place.
Alternatives Ways to Dig Post Holes If You Don’t have a Hole Digger
Don’t own a post hole digger? No worries, there are some other ways you can dig deep holes to install the fence posts. Here are a few alternatives to using a post hole digger.
Dig Small Holes with a Spade
If you are looking to dig small holes for planting saplings, you don’t need a post hole digger. A spade will do the job pretty amazingly, and you can dig enough deep holes required for the perfect plantation.
However, a spade isn’t the right tool if you are looking to install fencing posts, mailbox posts, or something else that needs a deep hole.

Use a Shovel
With a shovel, you can dig deeper holes that are suitable for installing fence posts. However, you should have the right type of shovel that pierces into the earth and brings a chunk out.
I have used a shovel to dig holes multiple times, but it takes a lot of time as compared to a post hole digger.

Post Hole Digger Hire
As said above, a post hole digger is a perfect tool you need to dig holes, and if you do not own one, you can rent it out. In several marketplaces, even Walmart offers rental services for post hole diggers, so you can return them once the job is done.
The rental is a lot cheaper while you don’t have to deal with the maintenance and other hassles associated with owning a hole digger.
Final Thoughts
Now that you know how to use a post hole digger and other important things about it, you are all set to dig the post holes.
The article even rounds up some tips that you will need to follow when digging holes for installing fence posts, mailbox posts, and more.
It’s indispensable to maintain and troubleshoot the post hole digger regularly so that the apparatus functions properly and helps you dig holes quickly and conveniently.
Lastly, the article even highlights a few alternatives you can use if you don’t have a post hole digger handy.